
January 2004 - Show-N-Tell
January 2004 - Show-N-Tell
Tread lightly, but show off an awesome floor! Standing on the ground, the judge asks you to open the door to your truck, and what does he or she see? Certainly not some grimy mess! You’ve already cleaned and polished and scrubbed. Your door jambs are a tribute to Spic ‘n Span. So those eyes come to rest on your floor.
If it’s carpet, it’s been cleaned and vacuumed, pebbles picked out and rubber floor mats washed and oiled with the same dressing you use on your tires. Or you may choose to travel a different route, with something which reflects your taste. A wood floor? One made of stainless steel? Or maybe ceramic tile? How about a custom carpet? Maybe even linoleum or fiberglass – you decide what suits your taste and abilities and fits into your budget.
We’ll look at three kinds of floors here – wood, stainless steel and ceramic tile. From do-it-yourself installation to having the work done by a shop or professional, the steps you go through to get ready are pretty much the same for all of them.
1) Allow yourself plenty of time to get the job done right – and always add in a “holy cow, we goofed up and need more time” factor. You may think you’re saving money by doing it yourself, but you might want to consider the cost of your downtime versus the value of having people who know what they’re doing perform the installation.
2) Make sure you have enough material and the right tools. If you’re doing it yourself, you’ll need whatever material you’ve decided to build the floor with, plywood, a drill, screwdrivers, ratchets and saws (a jigsaw or dremel with the right blades for cutting holes in the tight places is essential). If you’re going to use your plywood template as a base, be sure to purchase marine-grade plywood. Ordinary plywood tends to come apart when wet and your floor will not hold up well with a soggy bottom!
3) Be sure to mark all your connections – as you dismantle everything from the floor in your cab. Don’t rely on a good memory to put things back together. Air lines, shifter and transmission connections, pedals, seat brackets, anything mounted or attached to or through your floor will have to come off.
4) Build a template before you start putting together the finished product. You can work kinks out of your plan and get an idea of how the pieces will fit together before you make costly mistakes.
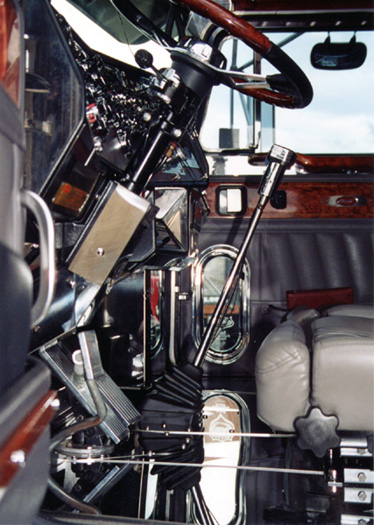
Neal & Barbara Holsomback’s award-winning 1988 Peterbilt 379, Plum Classy, went to Accurate Industries (Rig Skirts) in Flora, Indiana to become the prototype for a standard stainless steel floor. They allowed a week for the process. Holsomback hauls carpet and air freight. Design engineer Chuck King, who, along with his brothers, other family members and a devoted staff, runs this 40-year-old enterprise, decided to build the floor with 12-gauge laser-cut stainless steel. As the existing wood floor was removed, the warped pieces were laid out and became the beginning of the new template. Holsomback replaced the rubber pad that was underneath the flooring to provide a soft base for his new floor.
King transferred the existing dimensions (plus a variety of others) to his computer to create a program for their laser. The German-made laser, in their shop since 1998, is an amazing piece of equipment which cuts 8-foot by 100-inch sheets of stainless steel of varying thicknesses with pinpoint accuracy – at speeds of up to 340 inches per minute. Test pieces were run on inexpensive metal stock to determine where adjustments were needed. Once the rough stock pieces were fitted perfectly, the program was run on the “good stuff”. And the end result? A magnificent, gleaming stainless steel floor (see photo on page 68). Because of its mirror-like finish, it is hard to tell where the cab ends and the floor begins!
Holsomback keeps it protected with soft rugs when he runs up and down the road. But when he goes to a show, it only takes a few minutes and a bottle of window cleaner with ammonia to reveal this eye-popping complement to his shiny, decked-out rig. The cost is $1050 for your Peterbilt 379 with standard seat configuration, excluding labor. Pricing for Kenworth W900 will be finalized by the time you read this. All floors are available through their network of more than 400 dealers throughout the United States, Canada and Puerto Rico. Since the templates have already been developed, figure your down time from tear-down to ready-to-roll at about two days. You can call Accurate Industries at 800/283-1033 or check out their website at www.rigskirts.com.
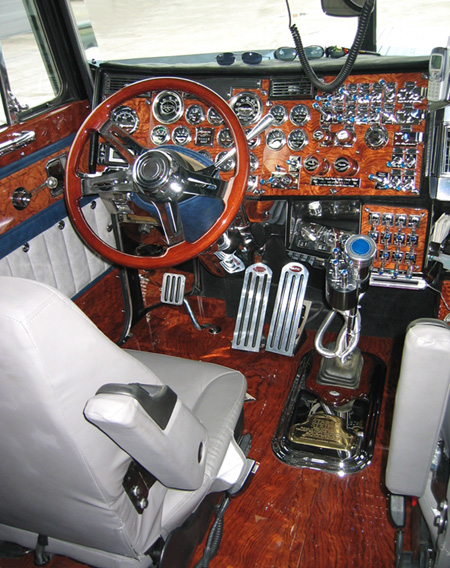
Want a wood floor? You can go to your local home center for oak or cherry boards and build one yourself – or, if a more exotic look is to your liking, you might consider an African Rosewood floor from Rockwood Products out of Manitowoc, Wisconsin.
Roger Wade had dreamed of having his floor custom-made since 1997, when he first saw a wood floor in someone else’s ride. His truck, a 1996 Peterbilt 379, pulling a 2000 Great Dane drop deck electronics van, runs about 85,000 miles a year, hauling trade shows, electronics, medical equipment and band equipment. In 2002, he saw a floor in a show truck that made him say, “I’ve got to have that.” So he asked about it and found out that it was built by Rockwood Products.
Rockwood’s process begins with buying an entire log of a Rosewood tree from Africa. The log is steamed in boiling water for several days in order to be able to peel or cut it into layers of veneer approximately 1/32" thick. Each layer is numbered, so the grain pattern that runs through the log is identifiable in sequence. For easier handling, bunches of these strips of veneer (called leaves) are bundled together with rope into a group called a flitch. Pieces of veneer range in width from 12-15 inches to as much as 30 inches, and run 11 to 12 feet long.
When the veneer comes in, it may not be perfectly smooth. To build the floor, the veneer is treated – it is soaked in a chemical bath, pressed flat, and then glued in a hot press to special high-quality marine grade plywood. The product is then trimmed and sanded. To build the finish, first, two coats of an oil barrier (primer) are applied. Then, four coats of polyester are applied. Next, the floor is sanded, custom artwork (if any) is inserted, and another four coats of polyester are added. The flooring is then sanded with a very fine grade of sandpaper and then 3-4 coats of polyurethane are added.
After building the floor, including adding Roger’s initials inlaid and centered in front of each seat, installation was pretty simple. Because the floor is all wood, the holes for seat bases, airlines, pedals and other attachments, could be drilled on the spot. A standard drill and bits made for a smooth completion, and didn’t crack or mar the finish. Holes for the clutch arm and brake valve are already cut into the floor. In addition, Rockwood provides a stainless steel threshold or molding to make the edges durable, as well as beautiful. Costs start at $1200 for a standard floor and around $1500 for a custom floor.
In addition to the floor, Wade had a new dash, door panels, window sills, arm rests and glove box cover custom made (see photo on page 69). The results, according to Wade, were, “Better than a peanut butter pie on a Sunday afternoon!” That makes him a happy camper. Rockwood sells their products exclusively through a network of more than 300 dealers, which covers the United States, Canada and Puerto Rico. For more information, visit them online at www.rockwoodproducts.com.
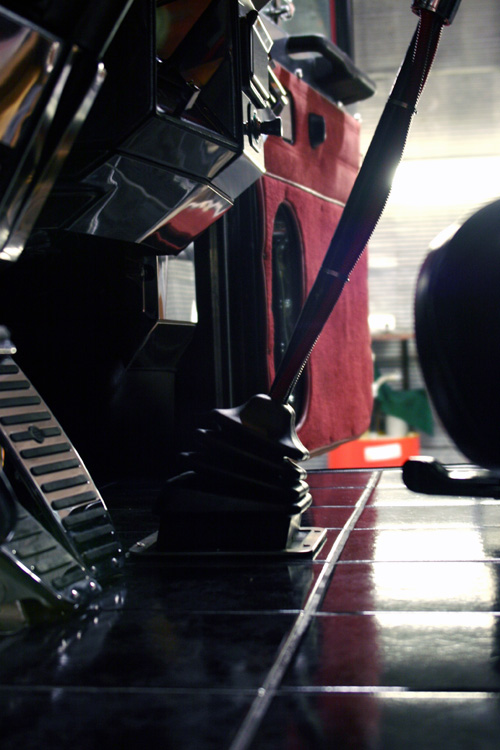
When “Tanker Dave” Marcotte decided to replace the carpet in his cab back in 2000, he spent a lot of time thinking about what he wanted to do. Marcotte, who hauls chicken rendering products in his 1992 Peterbilt 379 with a 1978 Heil tanker, has no wood anywhere in his cab or sleeper – he doesn’t have the plushest interior Peterbilt offered – it wasn’t his taste. So he evaluated granite, marble, ceramic tile – even carbon fiber – as possibilities. Cost was a factor. Material thickness and durability were also important considerations. He did his homework, consulted with a flooring professional, and ultimately selected 8-inch square home-grade ceramic tile.
After stripping the cab down on Friday night, Saturday morning found Dave fitting the new floor base. The underlayment (11/32" marine grade super plywood) was glued directly to the aluminum floor of the cab with a rubber sealant specifically designed for attaching plywood. The old floor padding (which was not reused) made a good template. The wood base was in two pieces, with the split running the long way in front of the seats – not between them.
The tile installer was a professional who agreed to do the job at a reduced rate for the challenge of doing something different. It took him about four hours on Sunday morning to install the tile and grout. He began at the back of the cab, centered in between the seat spaces, and worked his way from edge to edge, back to front and out of the cab. Because of the 8-inch tiles and his skill with his carbide cutter, in most places he was able to notch the tile to accommodate mounting brackets, air lines and other attachments. The only place he needed to cut an actual hole in a tile was one for the clutch arm.
In order to minimize the chance of the seat bases causing cracking or shifting, Marcotte made longer steel bushings (or spacers) which allowed the seat bases to be suspended a minuscule amount above the floor. Not visible even if you’re looking, there’s just enough room to slide a sheet of paper between the seat base and the tile floor. Sand grout was used everywhere except for the outside edges, where a silicone sealant was used in case a door seal ever needed to be changed.
Sunday afternoon and evening was spent putting the interior back together. Dave’s brother helped him set the seats – the rest he did on his own. And Monday morning, down the road he went, after a weekend project that cost less than $500, including two boxes of tile (he still has quite a few left), plywood, glue, grout and the cost of the tile installer.
There was no increase in weight – removing the existing carpet and pad netted out at about the same weight as the new plywood and tile. Maintenance is simple – just blow out the dirt with an air nozzle, wipe it down with a damp rag, and you’re ready to go. Marcotte keeps bathroom rugs with rubber backing on the floor – covered by the rubber floor mats. He drives with his shoes or boots on – and doesn’t take any other special precautions. And after almost four years, Marcotte claims that he has never had a cracked or damaged tile (see photo below).
Marcotte runs about 60-70,000 miles each year, but don’t let that number mislead you. When he’s not running up and down the road, he’s farming – in and out of fields, where his truck gets into mud and ruts, pulls and binds tough enough to rock your world. His cab does not have air ride. From Sept. 17 – Nov. 20, he ran only 1500 miles, but hauled over 1.6 million pounds of grain! Just another working truck?
Whether your budget is large or small,
your skills great or minimal, there are things you can do to make the most of
your truck. These three very different examples of floors proves that. Be sure
to tune in next time for more creative ideas, tips and tricks to make your working
truck show-worthy.
Copyright ©
2004 10-4 Magazine and Tenfourmagazine.com
PO Box 7377 Huntington Beach, CA, 92615 tel. (714) 378-9990 fax (714)
962-8506